Approving Trip Requests
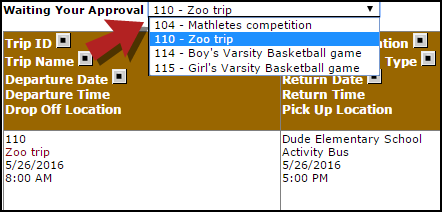
- When a trip routes to you for approval, you can locate the request on your home page by clicking on the number below Waiting Your Approval.

- Select the trip that you would like to approve from the Waiting Your Approval drop down menu. *Note: Trips will be displayed by Trip ID.
- Select the appropriate status from the drop down box: Approved, Pending, Canceled, Declined, or Duplicated. For more information about using the Trip Estimate statuses, see Trip Estimates.
![]()
- Changing the status to Approved, Canceled, or Declined will automatically check the Notify Booked By, Notify Contact, and Notify Driver boxes. Uncheck these boxes if you do not want the email notifications to be sent. *Note: These boxes will also automatically check if you click the Approve box at the bottom of the form before changing the status to Approved.
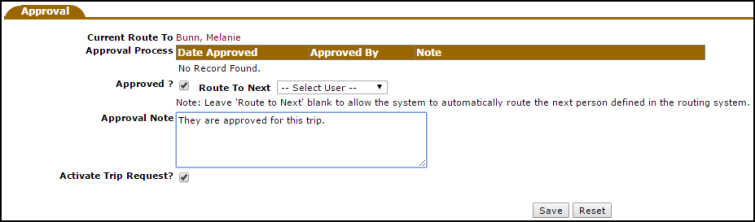
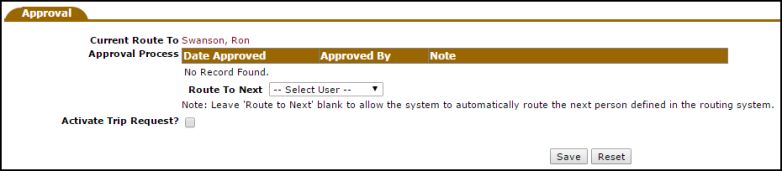
- Scroll down to the Approval section at the bottom of the form and enter an Approval Note if needed.
- If you are the final approver, check the box next to Activate Trip Request?. If you do not activate the trip request, it will go to the next approver as specified in your approval routing. If you do not have approval routing set up, the trip will route to the Comptroller. For more information about routing, see Automatic Routing.
- Click Save to process the request.
Assigning Drivers
Assigning Drivers to trips allows you to track which drivers are available at any given time and track their hours associated with the trip. You can assign a Driver to a trip request once it is Approved.
- Scroll down to the Transportation section of the trip request.
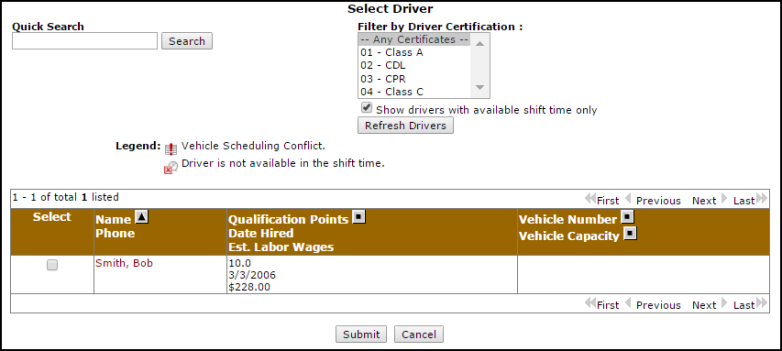
- Once the trip has been approved, the Select Driver link will become available.
- The link will open a pop-up window where you can select your driver. You can narrow down your search by Driver Certification if needed.
- By default, you will only see drivers who are available during that shift and who are not currently assigned to another trip. You can choose to view all drivers by unchecking the Show drivers with available shift time only box and clicking Refresh Drivers.
- Check the box next to the driver would you like to assign to this trip and click Submit.
- Repeat the process to add as many drivers to the trip as needed.
- Once you have successfully assigned a driver to the trip, their name will appear under the Assigned Drivers section. Click the red x (
 ) next to their name to remove them from the trip.
Assigning Vehicles
Assigning Vehicles to trips allows you to track which vehicles are available at any given time and track their mileage. You can assign a Vehicle to a trip request once it is Approved.
- Scroll down to the Transportation section of the trip request.
- Once the trip has been approved, the Select Vehicle link will become available.
- The link will open a pop-up window where you can select your vehicle. You can narrow down your search by Configuration Code or Transportation Type if needed.
- You will only see vehicles that are not currently assigned to another trip during the same dates/times. Check the box next to the vehicle would you like to assign to this trip and click Submit.

- Repeat the process to add as many vehicles to the trip as needed.
- Once you have successfully assigned a vehicle to the trip, the Vehicle Number will appear under the Assigned Vehicles section. Click the red x () next to the Vehicle Number to remove it from the trip.
Assigning Vendors
Assigning Vendors to trips allows you to track which vendors you use frequently and their associated costs. You can assign a Vendor to a trip request once it is Approved.
- Scroll down to the Transportation section of the trip request.
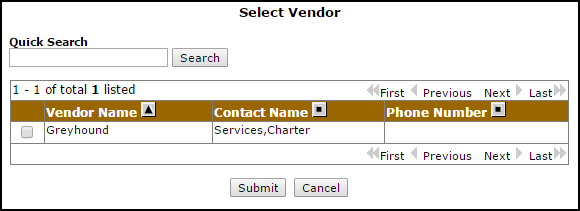
- Once the trip has been approved, the Select Vendor link will become available.
- The link will open a pop-up window where you can select your vendor. You can narrow down your search by typing the name of the vendor in the Quick Search bar.
- Check the box next to the vendor would you like to assign to this trip and click Submit.
- Repeat the process to add as many vendors to the trip as needed.
- Once you have successfully assigned a vendor to the trip, the Vendor Name will appear under the Assigned Vendors section. Click the red x () next to the Vendor Name to remove it from the trip.
Activating the Trip
- Once a trip has gone through the approval process, it should be Activated, or given final approval. *Note: Only Administrators can activate trip requests.
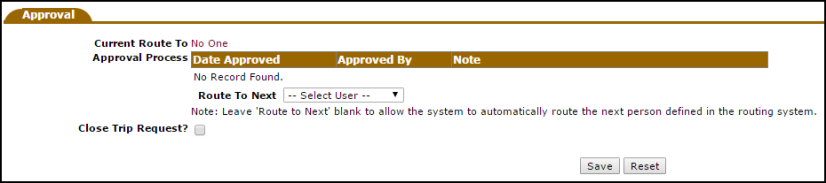
- To activate a trip, scroll down to the Approval section of the trip request form and check the box next to Activate Trip Request?.
- Click Save.
Closing the Trip
- Once a trip has been completed, you can mark it as Closed. *Note: You will only be able to close a trip request that has previously been activated.
- You cannot make changes or add transactions after a trip has been closed, so be sure to add that information before closing the trip.
- To close a trip, scroll down to the Approval section of the trip request and check the box next to Close Trip Request?. *Note: Only Administrators can close trip requests.
- Click Save.
- If you close a trip accidentally, you can click the Re-open Trip button to return the trip to Approved and Activated.

